Ray Wilson authored this content while he was actively running MFOS as the founder and resident genius.
We retain the content because it reflects a valuable point of view representing that time and place.
Article by Ray Wilson
Introduction
This circuit takes a sawtooth or ramp waveform as input and converts it to a triangle waveform. It is a rather simple circuit but very useful for generating this waveform. Since the MFOS Wave Freaker requires a triangle or sine wave as input this circuit is perfect for conditioning the ramp or sawtooth waveforms from the MFOS Sound Lab ULTIMATE, Sound Lab Mark II or Sound Lab Mini-Synth for use with one.I built this circuit on one of the Swiss OpAmp Knife PC boards to illustrate how to use them and how useful they can be.
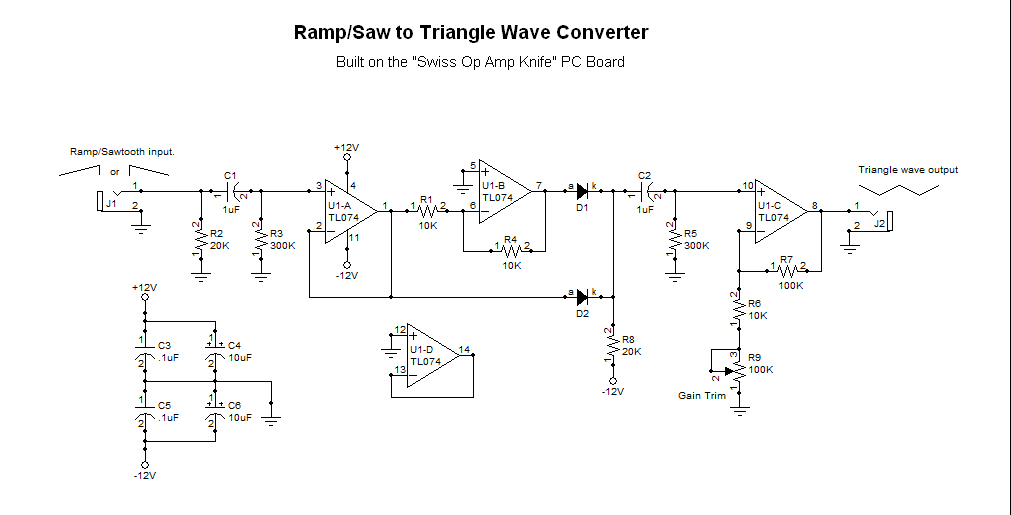
Schematic Page 1
View as PDF
Circuit Description
The sawtooth or ramp wave is applied to the Ramp/Sawtooth Input jack and is dropped on R2 20K resistor. Capacitor C1 (1uF non-polarized aluminum) AC couples the signal to the non-inverting input of U1-A (1/4 TL074) which acts as a high impedance unity gain buffer. We reference U1-A's non-inverting input to ground via R3 (300K resistor) to ground. AC coupling with 1uF looking at 300K will pass ramp signals down to about 20Hz with very little differentiation which would distort the resulting triangle wave. Even if the input signal is not oscillating about ground it will lose it's DC offset as it passes through C1 and thus the signal dropped across R3 and appearing at the non-inverting input of U1-A (and subsequently at it's output) will be oscillating evenly about ground.
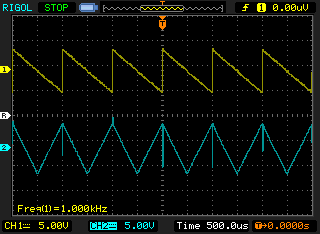
The output of U1-A feeds both the inverting input of U1-B (1/4 TL074) via R1 (10K resistor) used as a unity gain inverting buffer and the diode used to rectify the positive excursions of the ramp or sawtooth wave. Resistor R4 (10K) in conjunction with R1 (10K) gives U1-B it's unity gain (gain of -1). I suggest 1% metal film resistors for R1 and R4 but if you hand match some 10K 5% resistors for values within 1% of one another they will work fine. The signal at the output of U1-B pin 7 is an inverted copy of the signal at U1-A pin 1. The signals are rectified by D1 and D2 and dropped onto R8 (20K resistor to -12V). The diodes (D1 and D2 1N914 high speed switching diodes) rectify and sum the two signals in such a manner that the rectified peaks combine to produce a triangle waveform. As you can see in the scope photo a finite glitch occurs in the center of the triangle wave because the ramp or saw input wave has a finite rise (or fall) time. This glitch although caught by this 50 MHz scope will not be caught by your 20KHz ear. The rectified, summed "triangle" is AC coupled to the non-inverting input of U1-C which is referenced to ground by R5 (300K resistor). Feedback resistor R7 (100K resistor) in conjunction with gain set resistors R6 (10K resistor) and R9 (100K multi-turn trim pot) provide a facility to add gain as needed to bring the triangle signal up to the level you need in your system. The output is DC coupled to the Triangle wave output jack.
If the signal you are trying to convert is very high in amplitude and you need to reduce it I suggest you insert a resistor between the tip of the jack and the junction of R2 and C1 so that the inserted resistor and R2 will act as a voltage divider. Inserting a a 20K resistor will divide the incoming signal's amplitude in half. A higher value will attenuate more and a lower value will attenuate less.
If you need more output gain than can be applied by adjusting the trimmer then increase the value of R7.
Here is a scope photo showing the input and output waveforms. The glitch in the center of the triangle is on the order of 2uS wide and is not audible. With any subtractive filtering it will not even be visible.
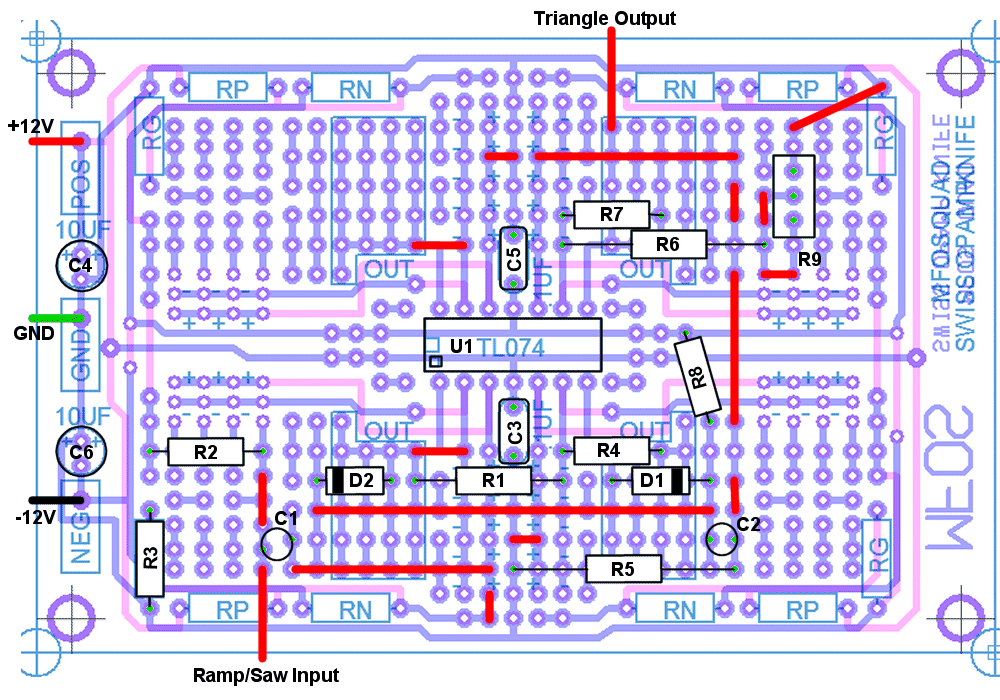
Swiss Op Amp Knife Board Component Placement with Values
If you use the Swiss Op Amp Knife PCB it is very important to put the components and jumper wires exactly as I have show them (see photo below for further aid). I suggest that you count the holes and closely observe positioning otherwise you will run into issues. Be careful not to short component leads or wires to any adjacent lands, pads or other components and wires. I powered my circuit with +/-12V which is my synth system's levels but this circuit should work fine at +/-9V through +/-15V.

Swiss Op Amp Knife Board Component Placement with Designators
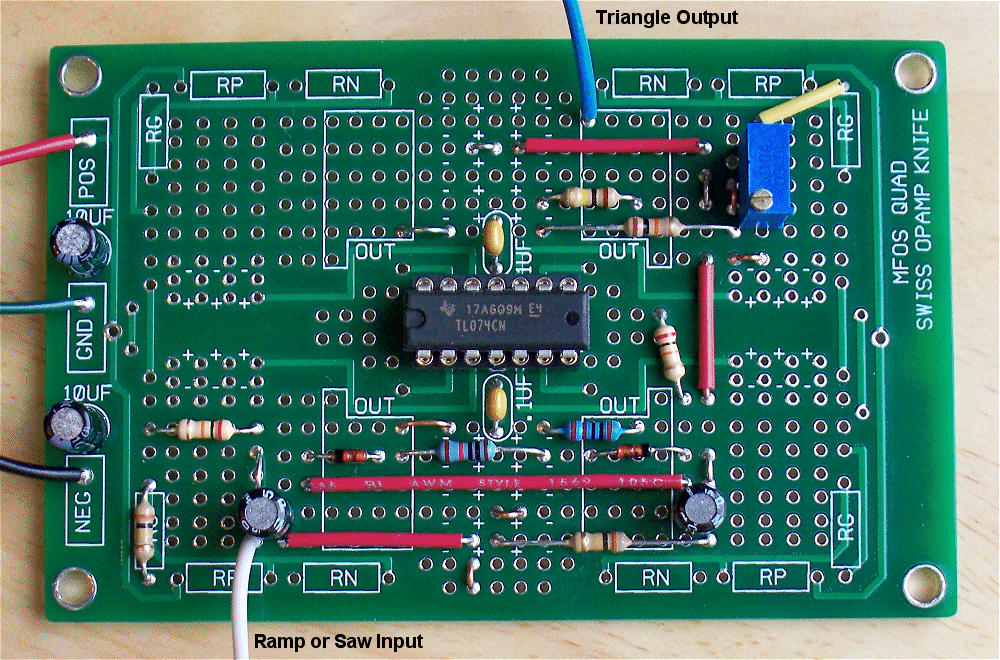
Swiss Op Amp Knife Board Component Placement Photo
View Larger ImageI built mine on the Swiss Op Amp Knife PC board and followed the component placement diagrams above and it worked first time!
Sawtooth Wave to Triangle Wave Converter Parts List
| Qty. | Description | Value | Designators |
|---|---|---|---|
| 1 | TL074 Quad Op Amp | TL074 | U1 |
| 2 | 1N914 Sw. Diode | 1N914 | D1, D2 |
| 2 | Resistor 1/4 Watt 1% | 10K | R1, R4 |
| 1 | Resistor 1/4 Watt 5% | 100K | R7 |
| 1 | Resistor 1/4 Watt 5% | 10K | R6 |
| 2 | Resistor 1/4 Watt 5% | 20K | R2, R8 |
| 2 | Resistor 1/4 Watt 5% | 300K | R3, R5 |
| 1 | Multi-Turn Trim Pot | 100K | R9 |
| 2 | Capacitor Alum. Nonpolarized | 1uF | C1, C2 |
| 2 | Capacitor Ceramic | .1uF | C3, C5 |
| 2 | Capacitor Electrolytic | 10uF | C4, C6 |
| 2 | Jack 1/4" 2 Terminal | J1, J2 | |
| 1 | Swiss Op Amp Knife PC Board |