Ray Wilson authored this content while he was actively running MFOS as the founder and resident genius.
We retain the content because it reflects a valuable point of view representing that time and place.
Article by Ray Wilson
IntroductionMaking synth panels is not difficult but can be a bit time consuming. The critical tools needed in my book are the heat laminator and the drill press although with a steady hand, a hand held drill works well too. If you don't use lamination the legends are a bit more prone to getting stained or marred but it is possible to skip the lamination if you just can't get access to a laminator. I like to use aluminum plate (0.063" ALUMINUM 6061 T6 SHEET) that I order in the size I want from this company: Metal Supermarkets. They have no minimum order and they have a ton of metal products. This grade of aluminum is easy to machine and is not too soft.
I suggest that you read the whole page before trying to do this. There are some steps that you need to anticipate or you can get into a fix. |
||||
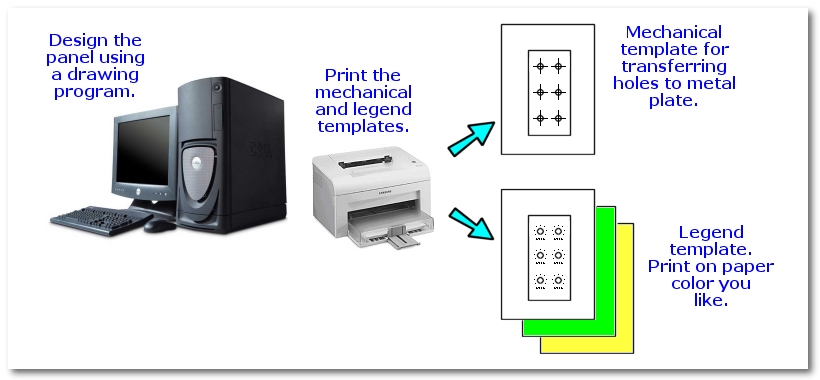
Design Your LayoutThe first thing you need to do is design the panel artwork. I like to work one to one (that is actual size). Any paint program will work, you'll just need to experiment a bit to get the hole sizes and such right. You can also make a library of sub-images like pot legends, logos, etc. in various sizes that you can cut and paste into your panel drawings to save time later. Don't forget to include the mounting holes in your design. You will need to make a mechanical type layout and the actual legend. Make sure that the legend template matches the mechnical one. I do this by making the legend template first and then using it to make the mechnical one. Making the mechanical one usually involves making exes in the centers of the holes so you can use it later to mark the aluminum panel. Print the legend template on the color of paper you like for your panels. I usually just print the mechanical template on white paper. |
||||
|
||||
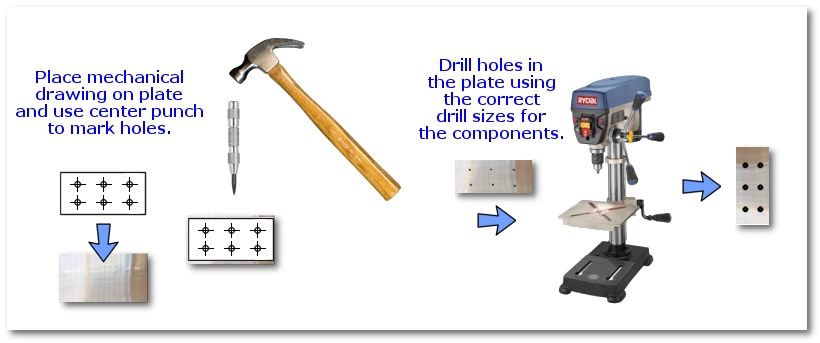
Prepare The PanelNext I like to make the panel. I cut the panel (0.063" ALUMINUM 6061 T6 SHEET) to size (ordering the size you want in the first place is way more convenient) and then I tape the mechanical template to the aluminum panel and use a center punch to mark the plate for drilling. Using the center punch gives the drill a nice starting place. I then drill the plate using the various hole sizes needed for the components. If you are making several plates drill all the same size holes and then move on to the next size. This saves a lot of chucking and unchucking of bits. |
||||
|
||||
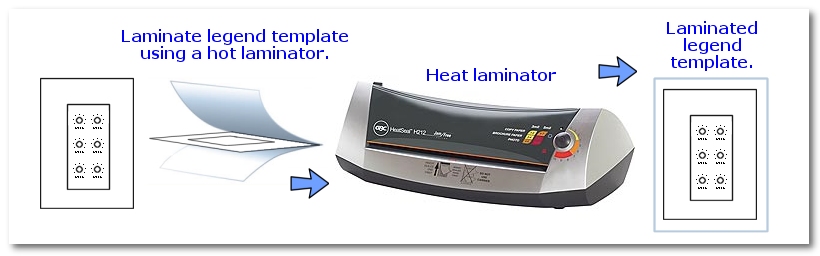
Laminate The Legend TemplateAs I state above you can skip this step but I think it results in a far more durable legend template. I'm betting that if you don't have a heat laminator that your company or school does and that someone will give you permission to use it. If you plan to build a lot of synth stuff then buying a heat laminator will set you back about $100.00 bucks but you will use it again and again. They come with a cardboard sheath that they recommend you use. So place the legend template into the clear lamination sheath and then place both into the cardboard sheath. Run it through the laminator. |
||||
|
||||
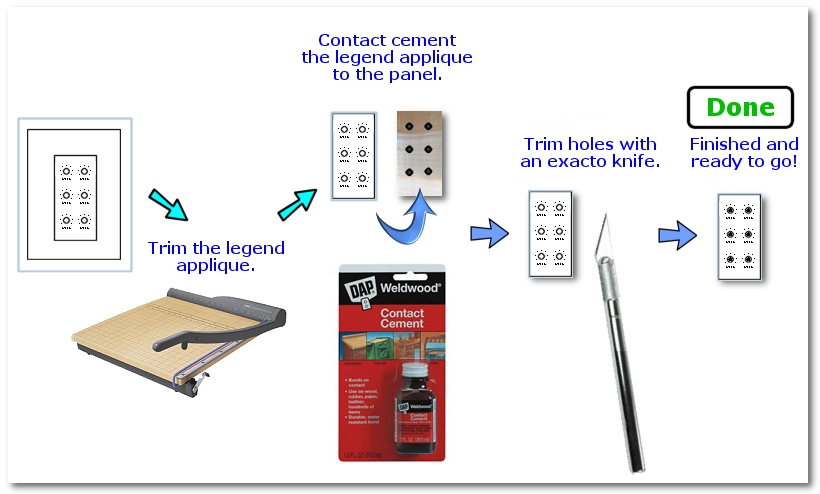
Trim And Apply The Legend TemplateUse a paper cutter to trim the laminated legend to size. You can use scissors but the paper cutter gives a nice straight line. Hold the legend up to the panel and determine exactly where it needs to go to line up with the holes. If you make everything nice and precise you should be able to just align the edges and voila everything lines up but check just in case. CAUTION You only get one shot at this next step so be careful. Apply the contact cement to the aluminum panel and try to get it nice and smooth. You don't need to cover every last surface just apply enough so that the legend template will stick and not have any floppy edges. Avoid getting adhesive on the back of the panel as it could get between the components you mount later and the metal surface (not good since you want the pot and jack bodies in good contact with the plate). Diehards would say you should also apply adhesive to the back of the legend template but you are going to mount pots and switches which will serve to hold the legend template to the panel as well so I just apply it to the panel. Now apply the legend template to the panel making sure to get it lined up where it is supposed to go. When it is applied cover the legend template with a clean piece of paper and burnish it. That means rub all over the surface to make sure that the legend template gets glued evenly to the plate. Let the glue dry for a while. I like to let it dry for at least an hour. Use an exacto knife to carefully cut out the holes in the legend template. Mount your pots and switches and have fun. |
||||
|
